How to use
Using RayCluster for task training
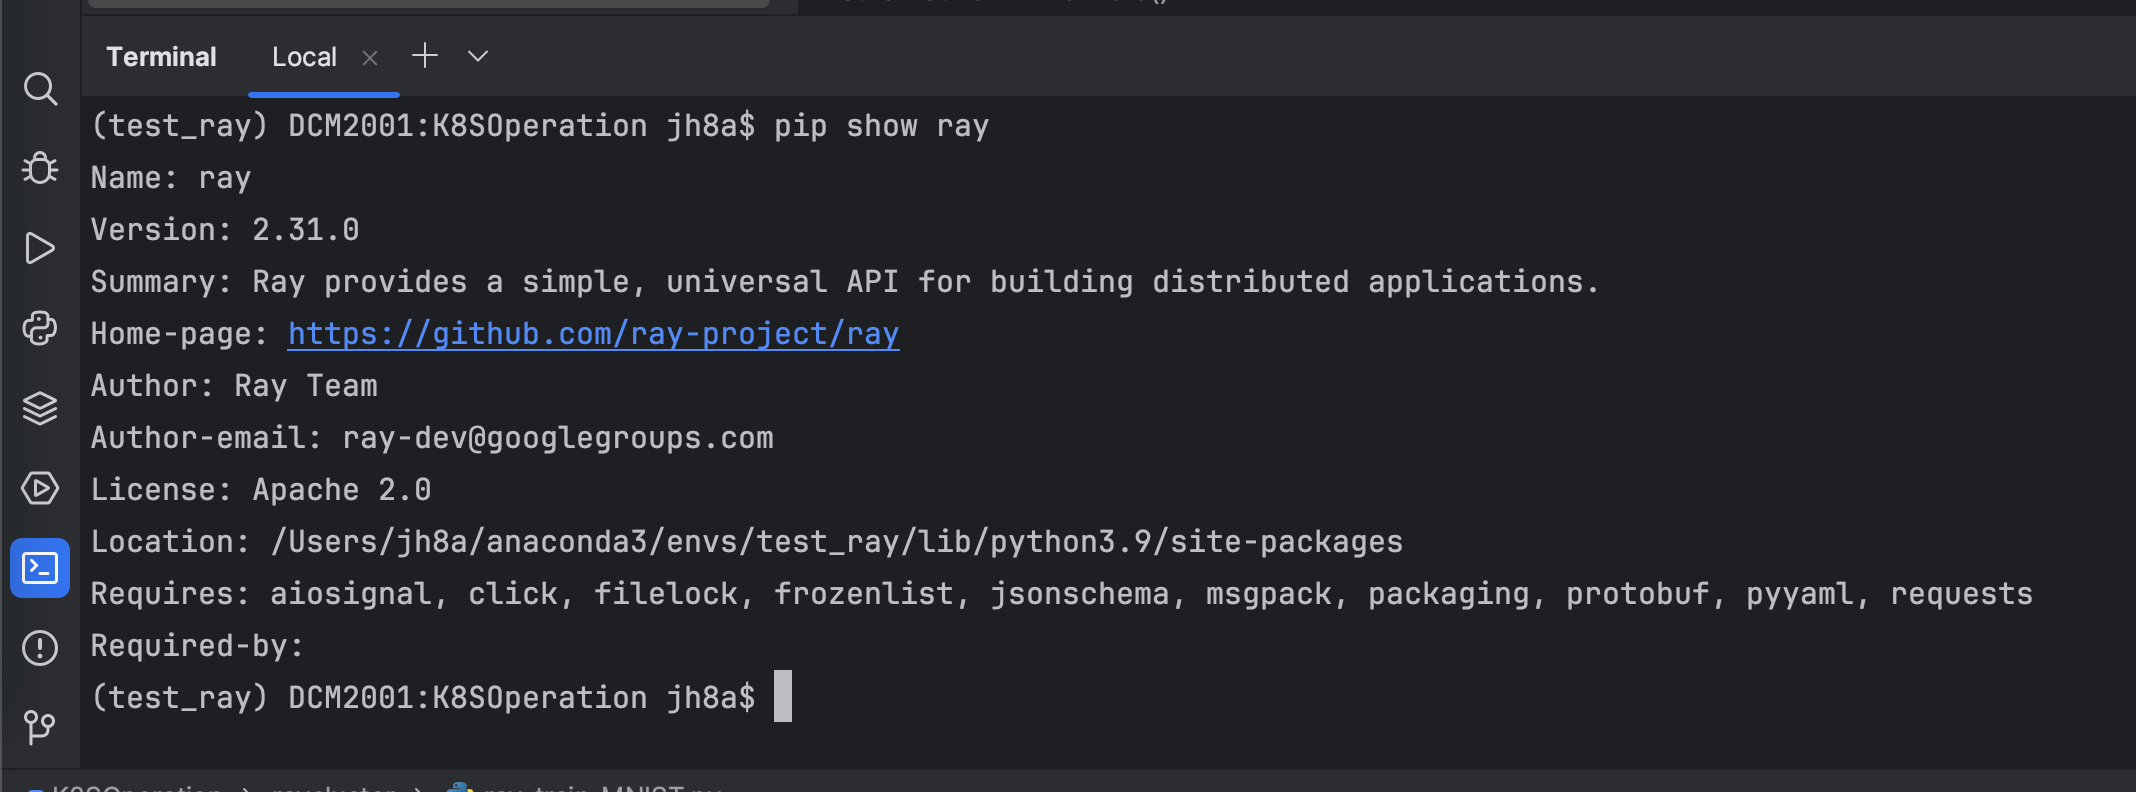
1.Ray Client dependency installation
pip install -U "ray[default]"
2.Write test code
Simple demo1
import ray
from ray import tune
from ray import train
import torch
import torch.nn as nn
import torch.optim as optim

# Define your runtime environment, including required Python packages
runtime_env = {
    "pip": ["numpy", "torch"]
}

# Connect to the existing Ray cluster and set runtime_env
ray.init(runtime_env=runtime_env)
print("CUDA available:", torch.cuda.is_available())
print("PyTorch version:", torch.__version__)

# Define a simple neural network
class SimpleModel(nn.Module):
    def __init__(self):
        super(SimpleModel, self).__init__()
        self.fc = nn.Linear(1, 1)

    def forward(self, x):
        return self.fc(x)

# Define training function
def train_model(config):
    # Move model to GPU
    model = SimpleModel().to("cuda")
    criterion = nn.MSELoss()
    optimizer = optim.SGD(model.parameters(), lr=config['lr'])

    # Create some fake data and move it to the GPU
    x = torch.tensor([[1.0], [2.0], [3.0], [4.0]]).to("cuda")
    y = torch.tensor([[2.0], [4.0], [6.0], [8.0]]).to("cuda")

    for epoch in range(10):
        model.train()
        optimizer.zero_grad()
        outputs = model(x)
        loss = criterion(outputs, y)
        loss.backward()
        optimizer.step()

        # Report results using ray.train.report
        train.report(dict(loss=loss.item()))

# Hyperparameter search using Ray Tune
config = {
    'lr': tune.grid_search([0.01, 0.1, 1.0])
}

# Run training tasks, specifying 1 GPU per task
analysis = tune.run(
    train_model,
    config=config,
    resources_per_trial={"cpu": 2, "gpu": 1},
    num_samples=2  # For testing, run two tasks
)

# Output results
print("Best config: ", analysis.get_best_config(metric="loss", mode="min"))
Train a PyTorch Model on Fashion MNIST(More GPU)
#!/usr/bin/env python
# _*_ coding: utf-8 _*_
# time: 2024/7/10 14:15
# file: ray_train_MNIST.py
# @Author : Json.J.Hu
# @Version:V 0.1
# @desc : Train a PyTorch Model on Fashion MNIST
# This part imports various libraries needed during the training process, including PyTorch, Ray, and torchvision for data processing. FileLock is used to securely handle files in a multi-process environment.
import os
from typing import Dict
import torch
from filelock import FileLock
from torch import nn
from torch.utils.data import DataLoader
from torchvision import datasets, transforms
from torchvision.transforms import Normalize, ToTensor
from tqdm import tqdm
import ray.train
from ray.train.torch import TorchTrainer
from ray.train import ScalingConfig, RunConfig
# 1.Define your runtime environment, including required Python packages
runtime_env = {
"pip": ["numpy", "torch","torchvision"]
}
# 2. Data loader function (can read data sets such as github, huggingface, etc.)
'''
This function downloads the Fashion MNIST data set from the Internet through torchvision.datasets.
And convert it into PyTorch's DataLoader object for subsequent model training and testing.
The data has been standardized (mean 0.5, standard deviation 0.5).
'''
def get_dataloaders(batch_size):
# Transform to normalize the input images
transform = transforms.Compose([ToTensor(), Normalize((0.5,), (0.5,))])
with FileLock(os.path.expanduser("~/data.lock")):
# Download training data from open datasets
training_data = datasets.FashionMNIST(
root="~/data",
train=True,
download=True,
transform=transform,
)
# Download test data from open datasets
test_data = datasets.FashionMNIST(
root="~/data",
train=False,
download=True,
transform=transform,
)
# Create data loaders
train_dataloader = DataLoader(training_data, batch_size=batch_size, shuffle=True)
test_dataloader = DataLoader(test_data, batch_size=batch_size)
return train_dataloader, test_dataloader
#3. Define neural network model
'''
This is a simple multi-layer neural network used to classify the Fashion MNIST dataset.
It contains two hidden layers, each hidden layer is followed by a ReLU activation function and a Dropout layer.
The last layer maps the data to 10 categories (corresponding to the 10 labels of Fashion MNIST).
'''
# Model Definition
class NeuralNetwork(nn.Module):
def __init__(self):
super(NeuralNetwork, self).__init__()
self.flatten = nn.Flatten()
self.linear_relu_stack = nn.Sequential(
nn.Linear(28 * 28, 512),
nn.ReLU(),
nn.Dropout(0.25),
nn.Linear(512, 512),
nn.ReLU(),
nn.Dropout(0.25),
nn.Linear(512, 10),
nn.ReLU(),
)
def forward(self, x):
x = self.flatten(x)
logits = self.linear_relu_stack(x)
return logits
# 4.Define training function
'''
This function is the training function of each worker node and contains the following main steps:
1).Get the data loader
2).Prepare data loaders and models to support distributed training
3).Train using cross-entropy loss function and stochastic gradient descent optimizer
4).At the end of each epoch, evaluate the performance of the model and report the loss and accuracy through ray.train.report
'''
def train_func_per_worker(config: Dict):
lr = config["lr"]
epochs = config["epochs"]
batch_size = config["batch_size_per_worker"]
# Get dataloaders inside the worker training function
train_dataloader, test_dataloader = get_dataloaders(batch_size=batch_size)
# [1] Prepare Dataloader for distributed training
# Shard the datasets among workers and move batches to the correct device
# =======================================================================
train_dataloader = ray.train.torch.prepare_data_loader(train_dataloader)
test_dataloader = ray.train.torch.prepare_data_loader(test_dataloader)
model = NeuralNetwork()
# [2] Prepare and wrap your model with DistributedDataParallel
# Move the model to the correct GPU/CPU device
# ============================================================
model = ray.train.torch.prepare_model(model)
loss_fn = nn.CrossEntropyLoss()
optimizer = torch.optim.SGD(model.parameters(), lr=lr, momentum=0.9)
# Model training loop
for epoch in range(epochs):
if ray.train.get_context().get_world_size() > 1:
# Required for the distributed sampler to shuffle properly across epochs.
train_dataloader.sampler.set_epoch(epoch)
model.train()
for X, y in tqdm(train_dataloader, desc=f"Train Epoch {epoch}"):
pred = model(X)
loss = loss_fn(pred, y)
optimizer.zero_grad()
loss.backward()
optimizer.step()
model.eval()
test_loss, num_correct, num_total = 0, 0, 0
with torch.no_grad():
for X, y in tqdm(test_dataloader, desc=f"Test Epoch {epoch}"):
pred = model(X)
loss = loss_fn(pred, y)
test_loss += loss.item()
num_total += y.shape[0]
num_correct += (pred.argmax(1) == y).sum().item()
test_loss /= len(test_dataloader)
accuracy = num_correct / num_total
# [3] Report metrics to Ray Train
# ===============================
ray.train.report(metrics={"loss": test_loss, "accuracy": accuracy})
# 5. main training function
'''
This function sets the relevant configuration of distributed training, including how many worker nodes (num_workers) to use and whether to use a GPU (use_gpu), and then initializes and starts distributed training.
This function is the main function of the entire training process and includes the following main steps:
1).Configure training parameters
2).Configure computing resources
3).Initialize Ray TorchTrainer
4).Start distributed training
'''
def train_fashion_mnist(num_workers=1, use_gpu=True):
global_batch_size = 32
train_config = {
"lr": 1e-3,
"epochs": 10,
"batch_size_per_worker": global_batch_size // num_workers,
}
# Configure computation resources
scaling_config = ScalingConfig(num_workers=num_workers, use_gpu=use_gpu)
# Initialize a Ray TorchTrainer
#run_config = RunConfig(storage_path="/mnt/shared_storage/ray_result")
trainer = TorchTrainer(
train_loop_per_worker=train_func_per_worker,
train_loop_config=train_config,
scaling_config=scaling_config,
#run_config=run_config # 指定存储路径
)
# [4] Start distributed training
# Run `train_func_per_worker` on all workers
# =============================================
result = trainer.fit()
print(f"Training result: {result}")
# 6.Main function: Run training task
'''
This is the entry function for the entire training process, which includes the following main steps:
1).Initialize Ray cluster
2). Call the train_fashion_mnist function to start training
'''
if __name__ == "__main__":
ray.init(runtime_env=runtime_env)
train_fashion_mnist(num_workers=2, use_gpu=True)
3.Submit Job to RayCluster
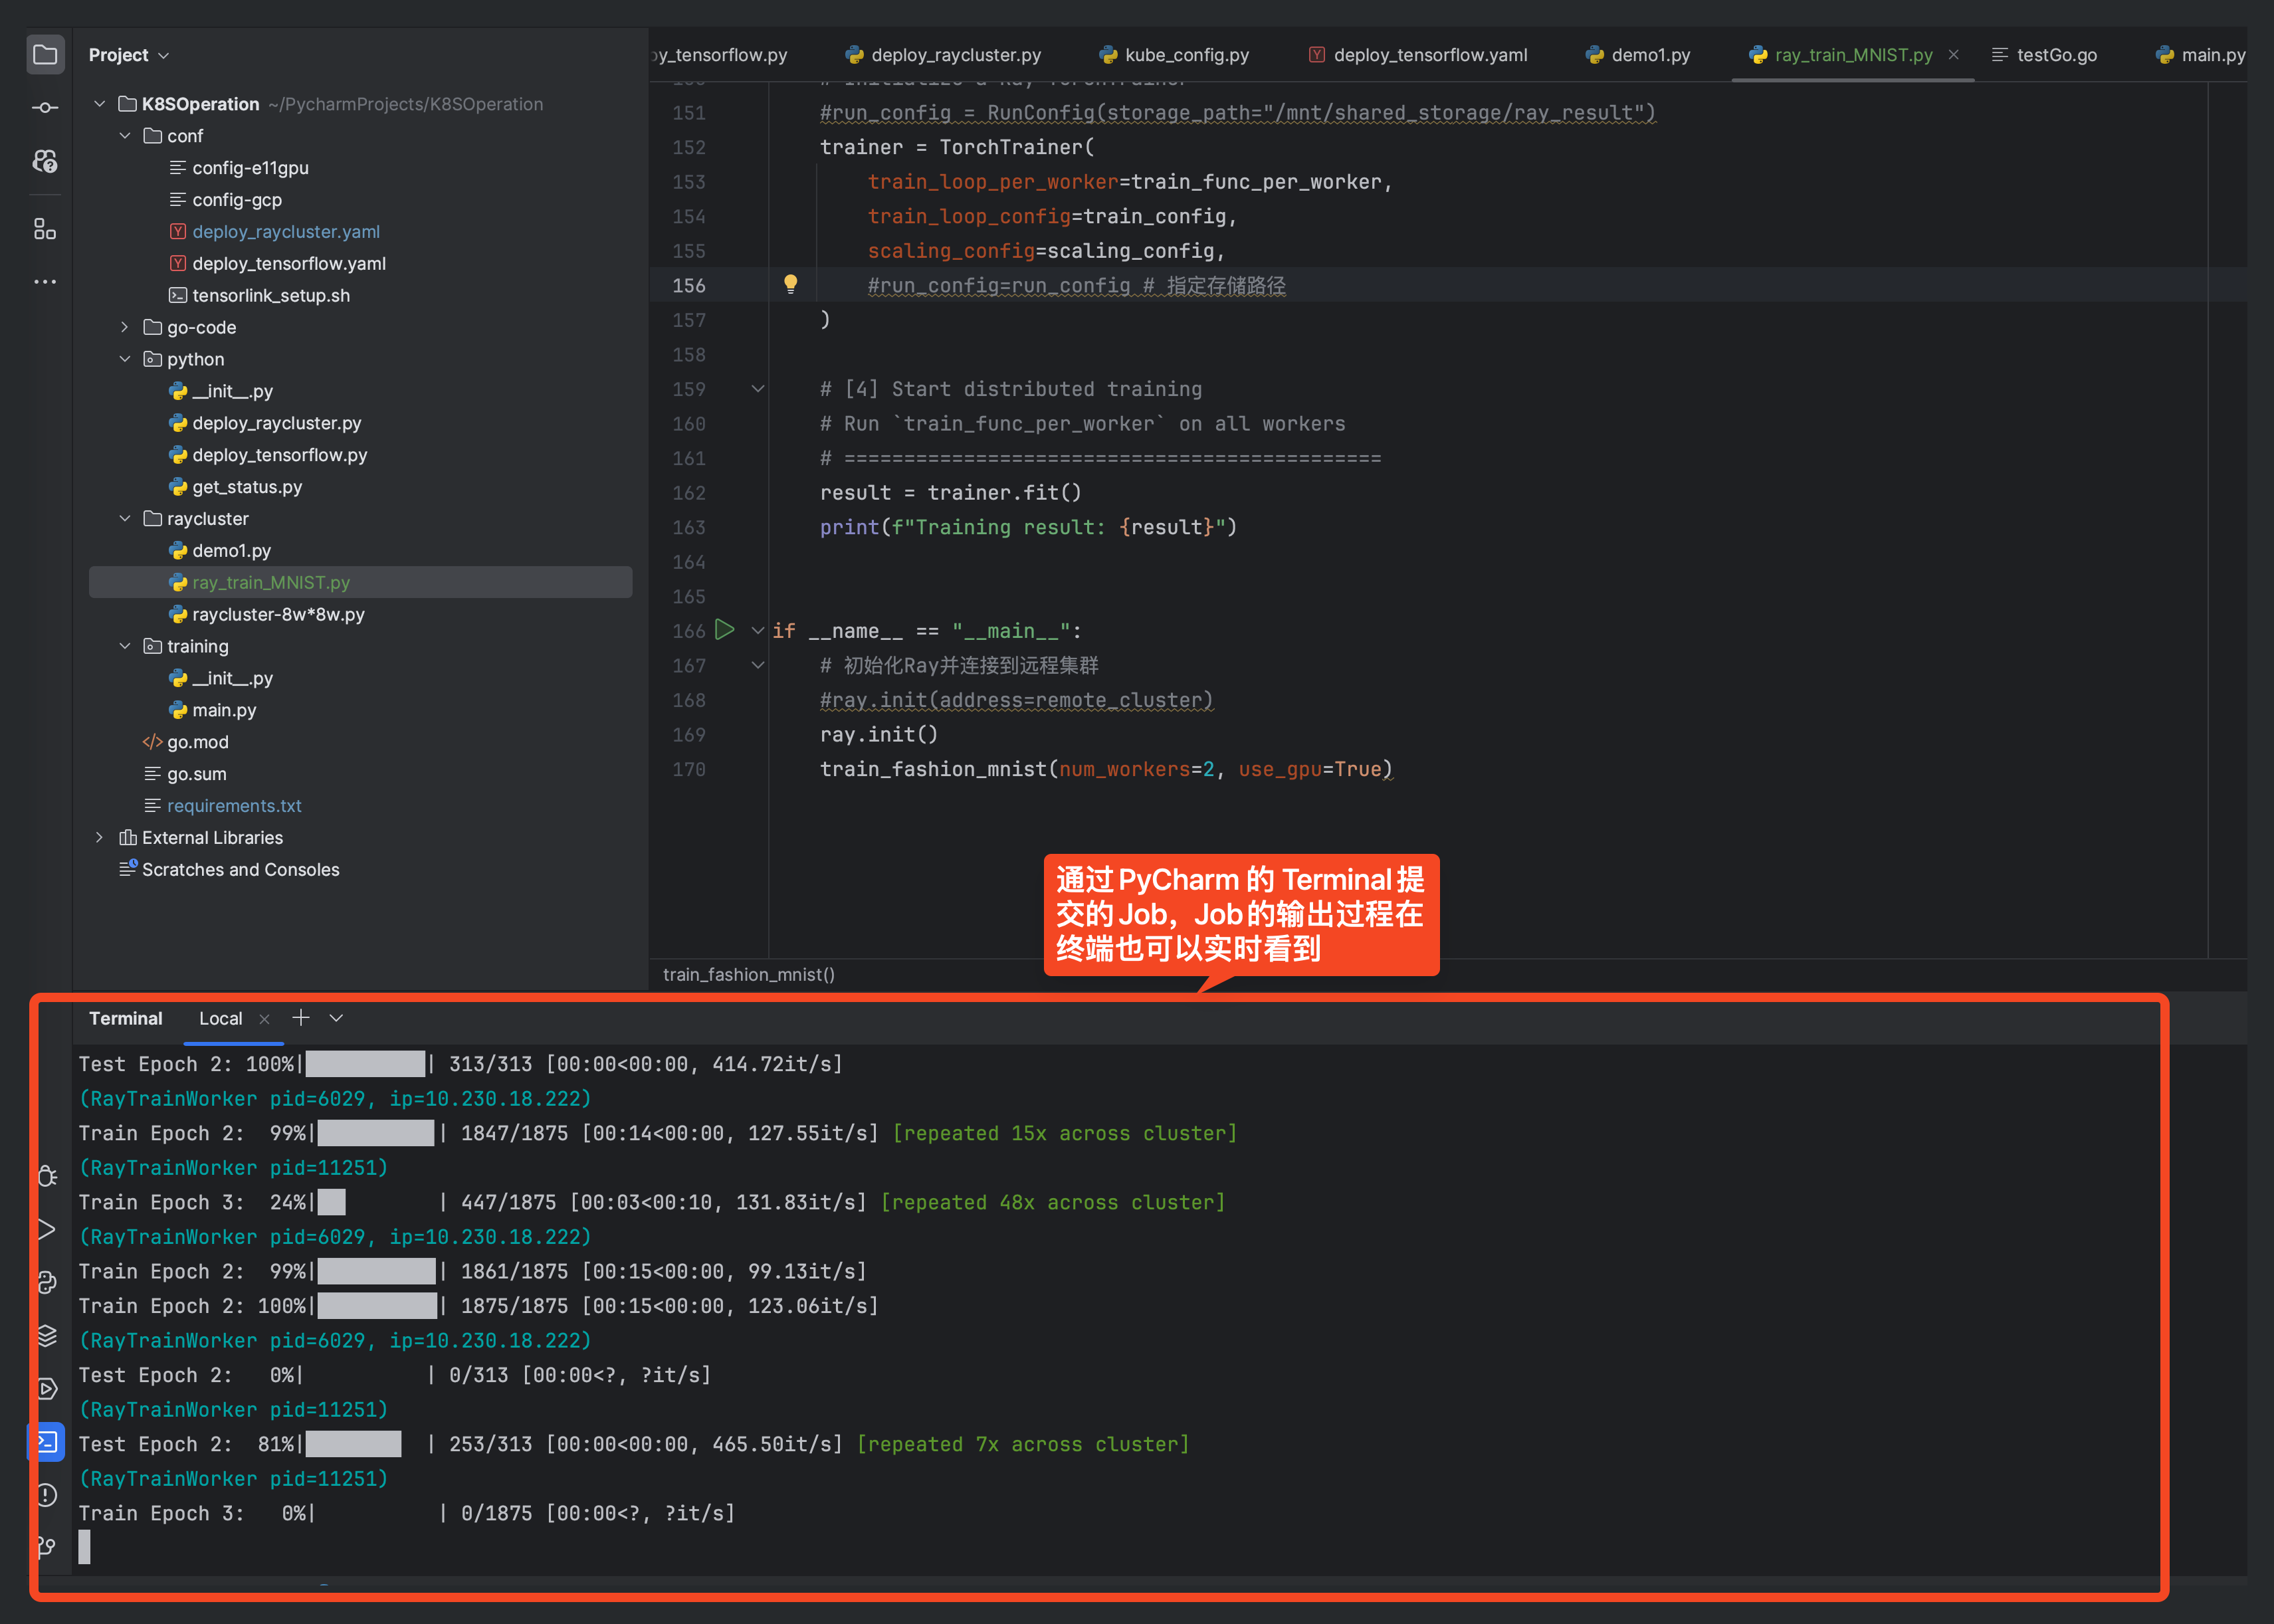
3.1 Submit Job through PyCharm (depends on local Ray environment)
ray job submit --verify false --address=https://ray-c1.service.nicegpu.com/ --working-dir . -- python demo1.py
illustrate:
- --address is the address of RayCluster (your real RayCluster address),
- --working-dir is the working directory (do not modify it),
- -- python demo1.py is the python code of the task to be submitted
Note: -- There is a space after -- in python demo1.py, do not delete it
3.2 Submit your job using the Notebook we provide
- Create a new Python3 Notebook in Notebook and write Python code
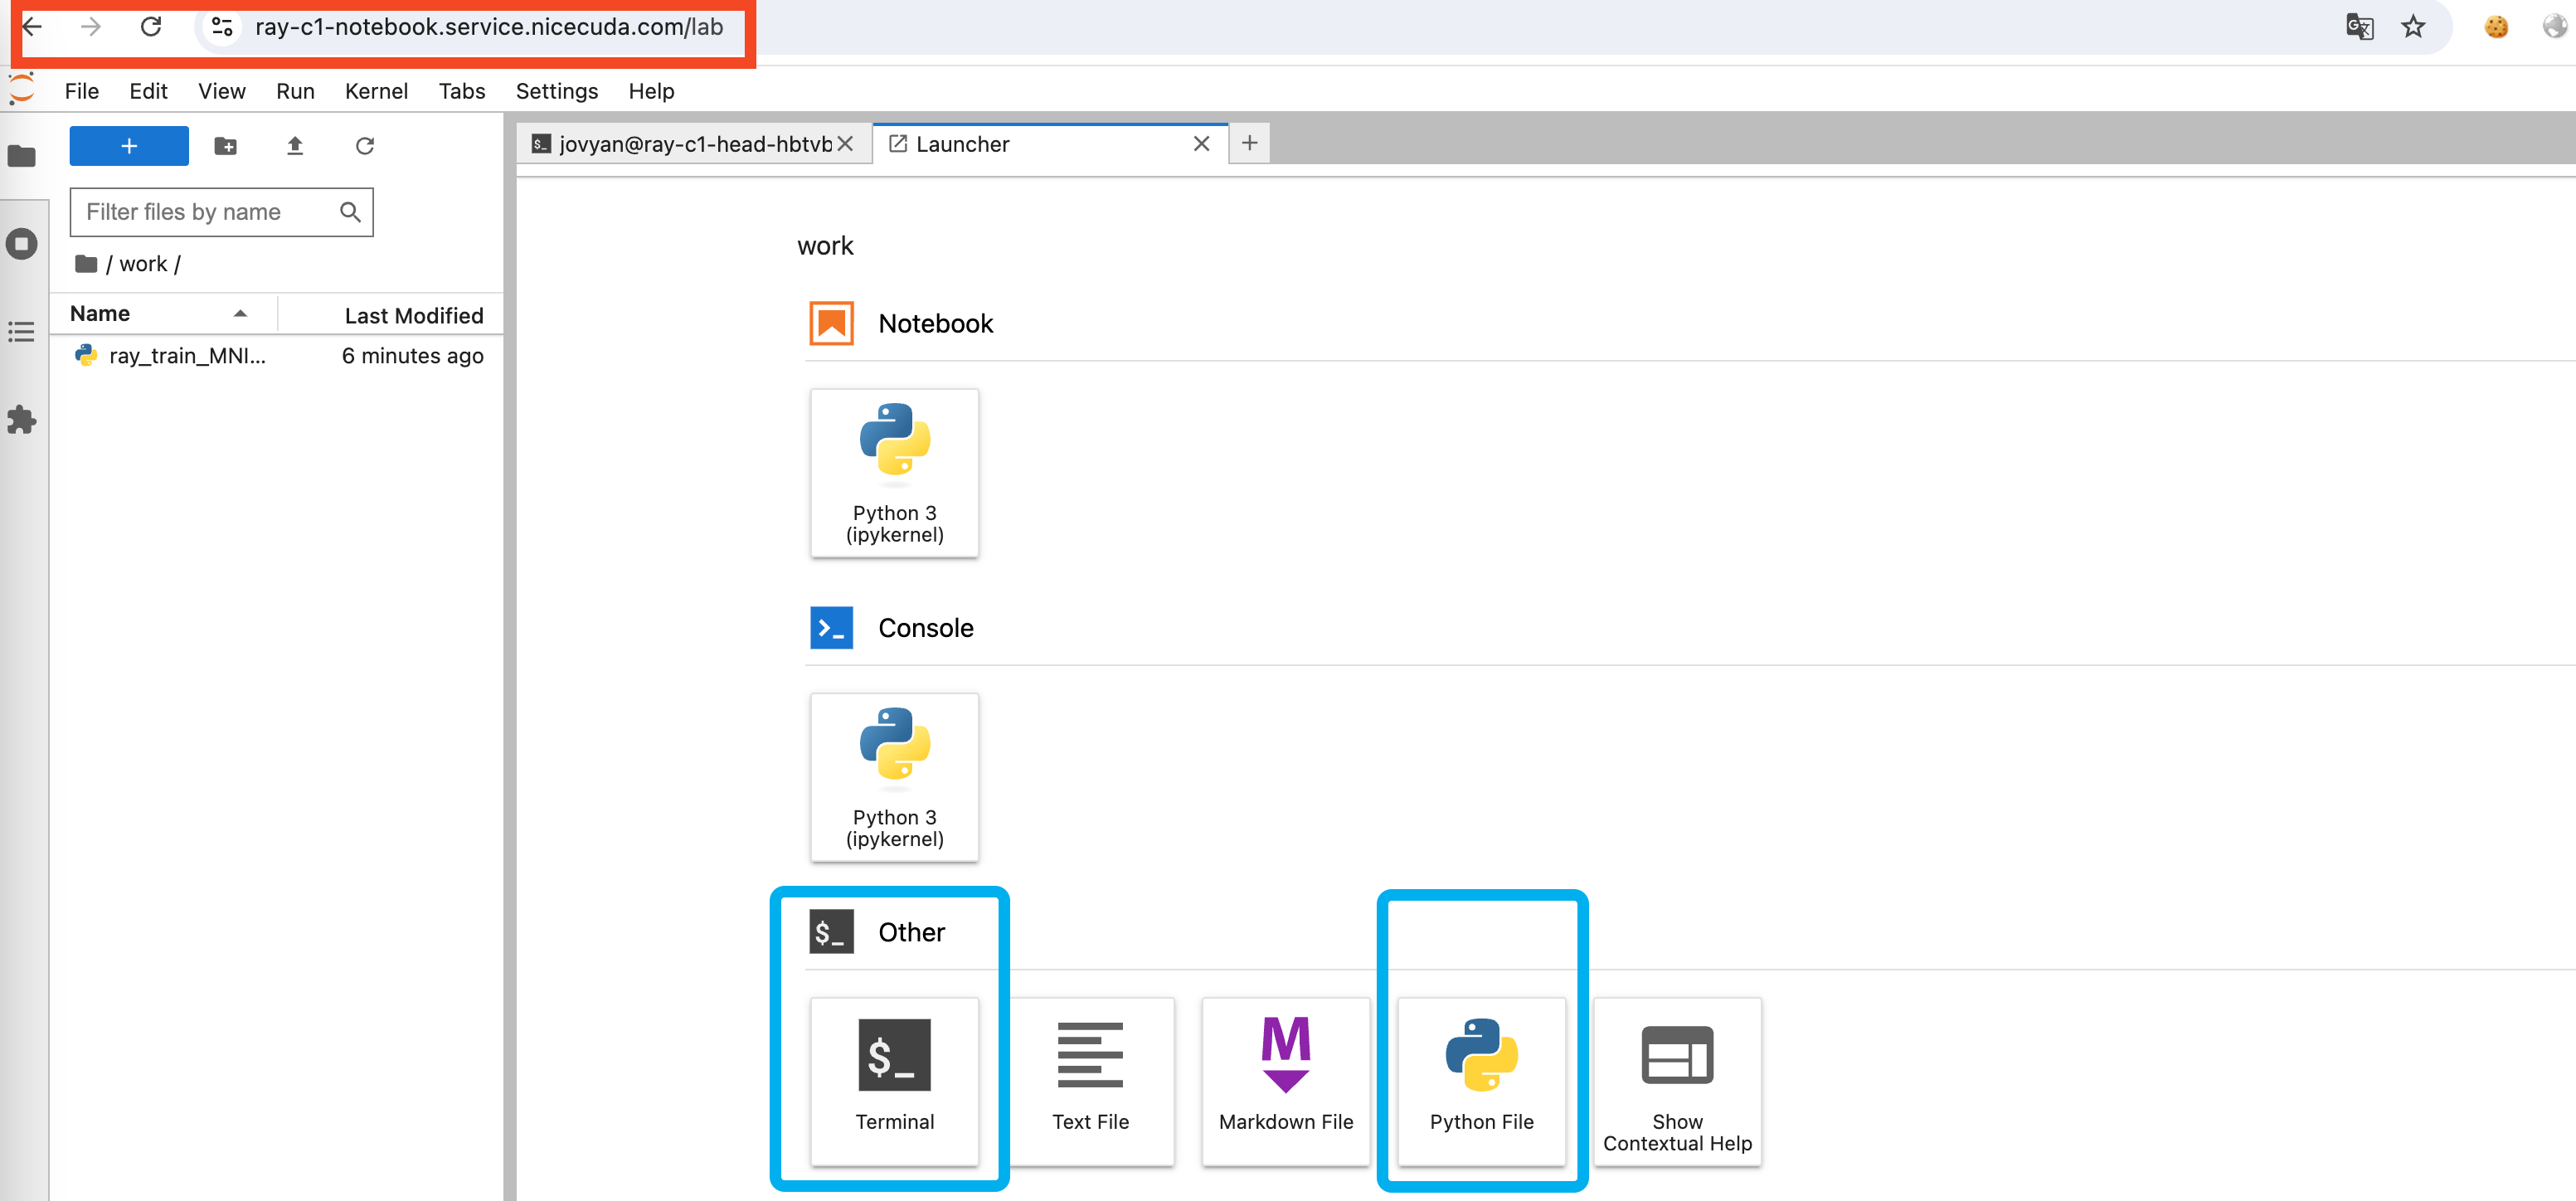
-
Submit Job using Terminal
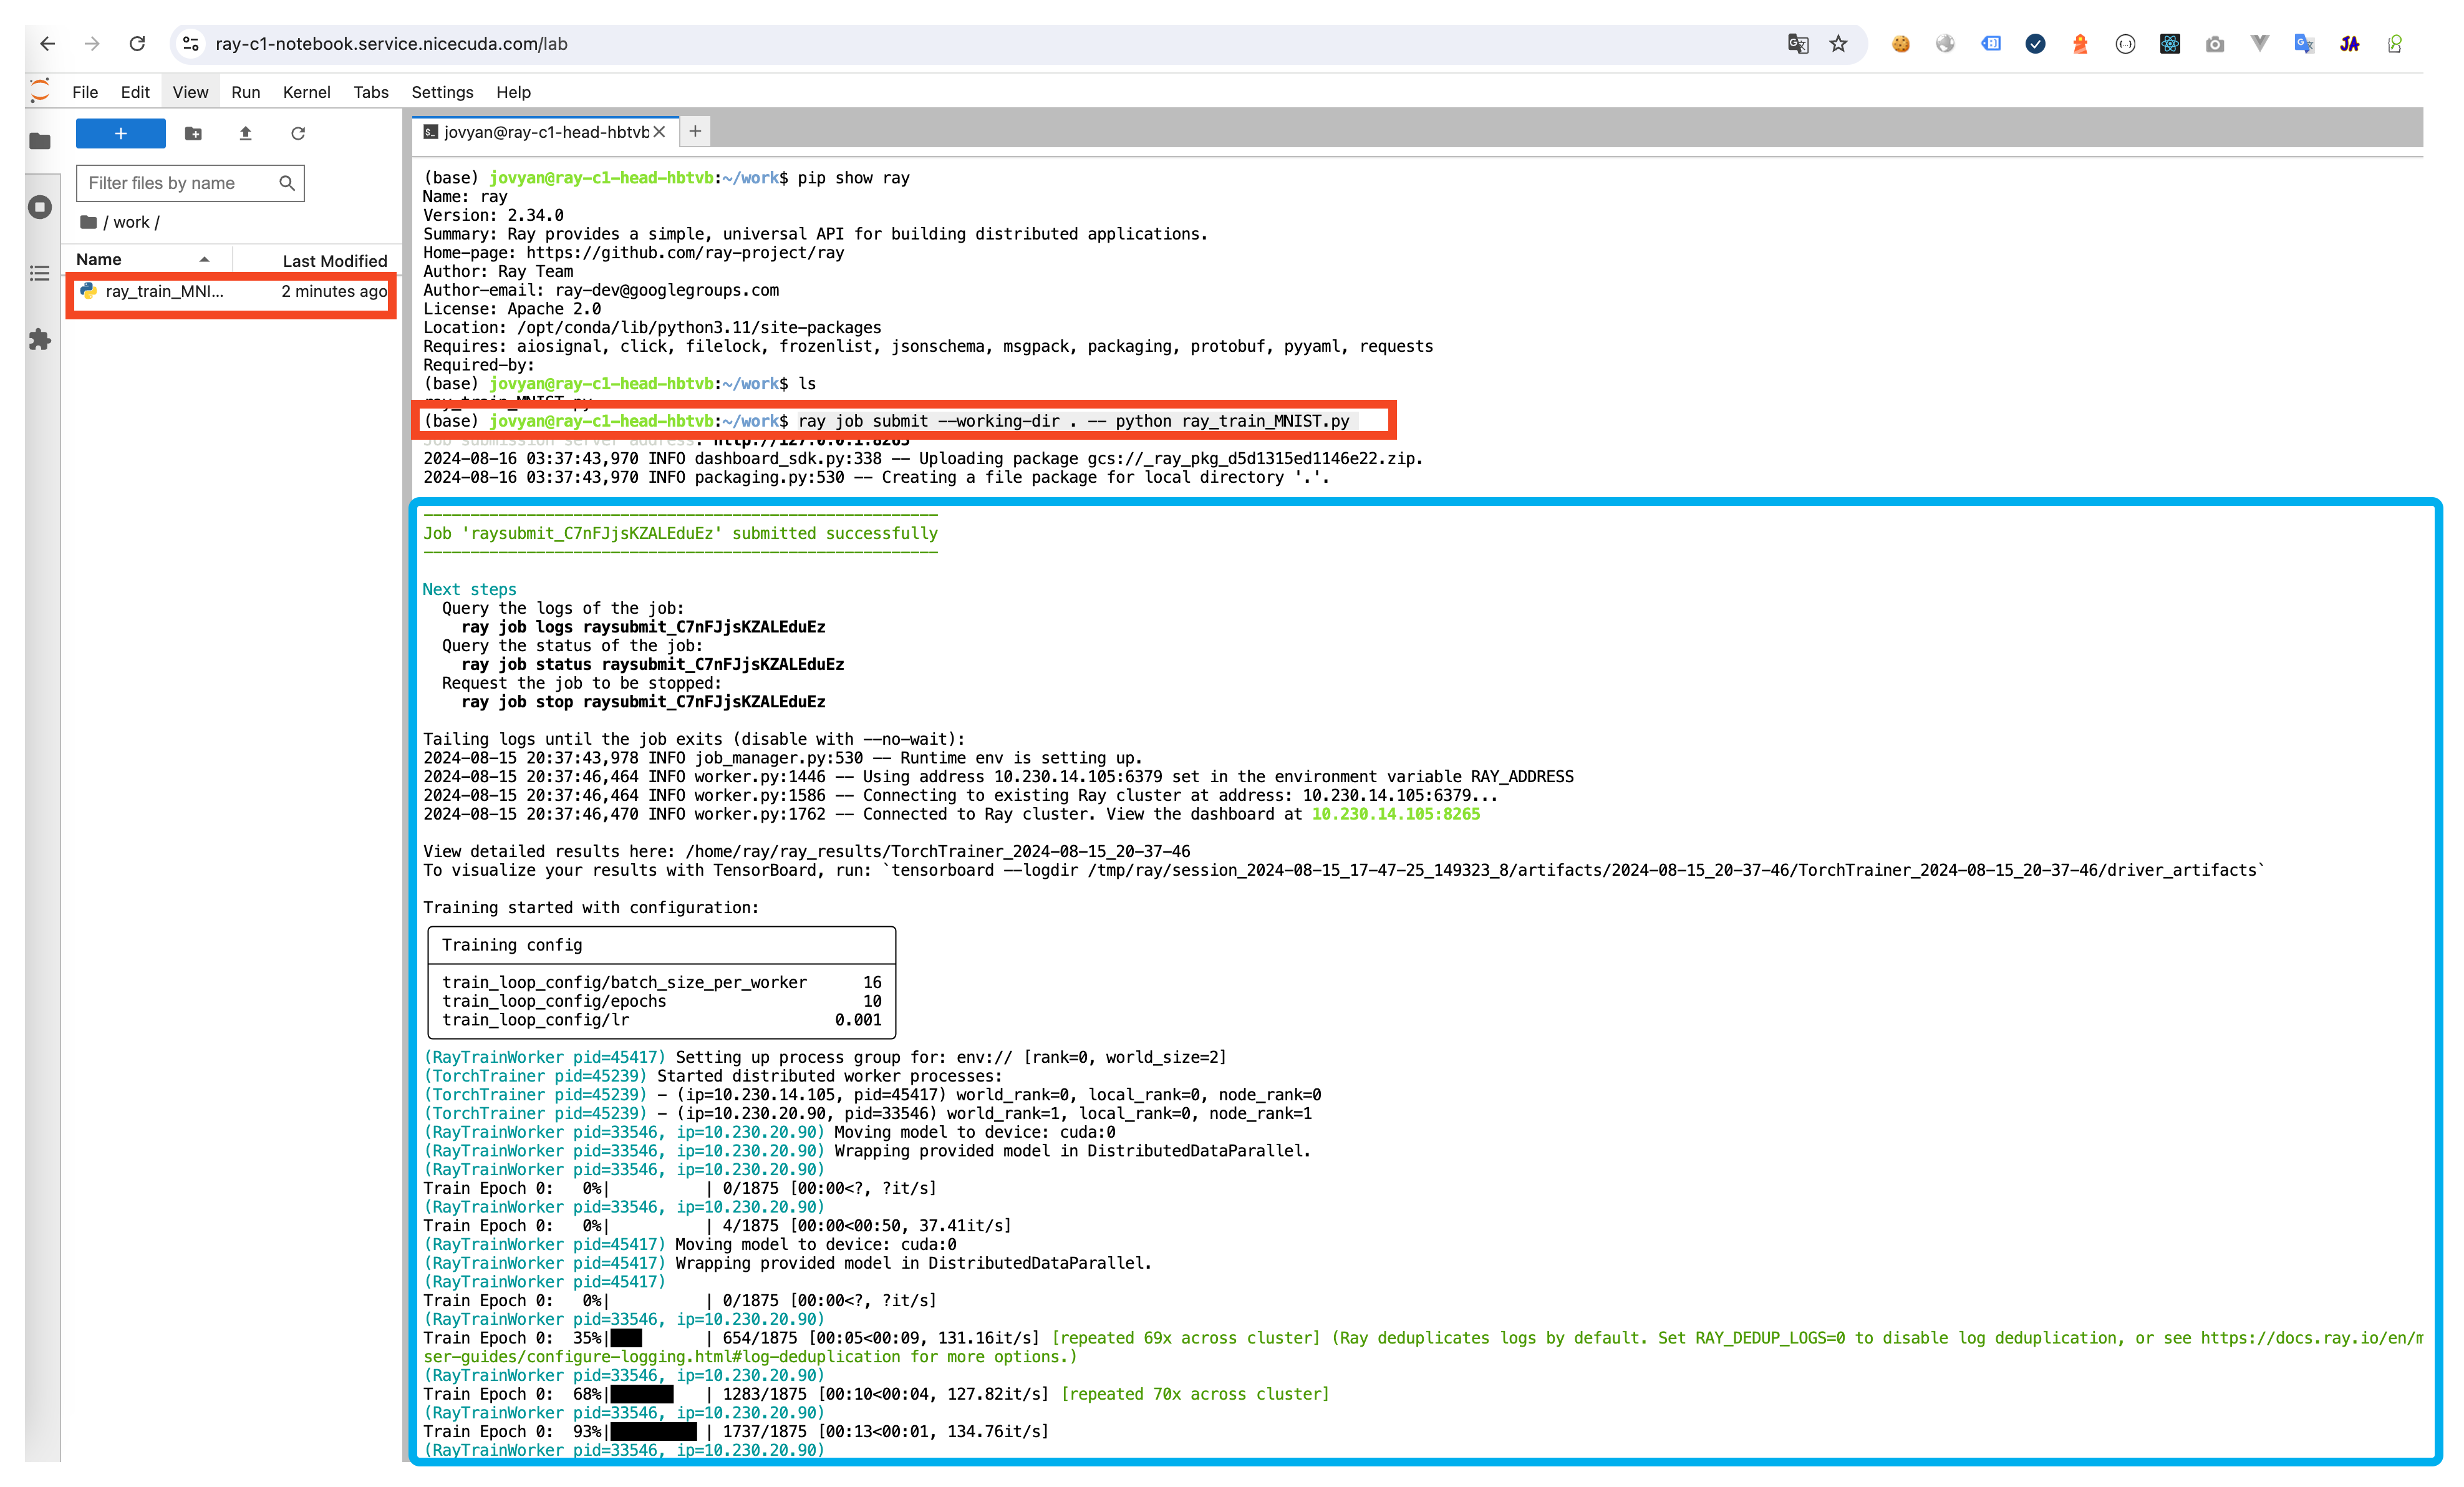
ray job submit --verify false --working-dir . -- python demo1.py -
Query Job execution results
4.Query execution results
-
Address Of Monitor Dashboard:https://ray-c1.service.nicegpu.com/#/cluster
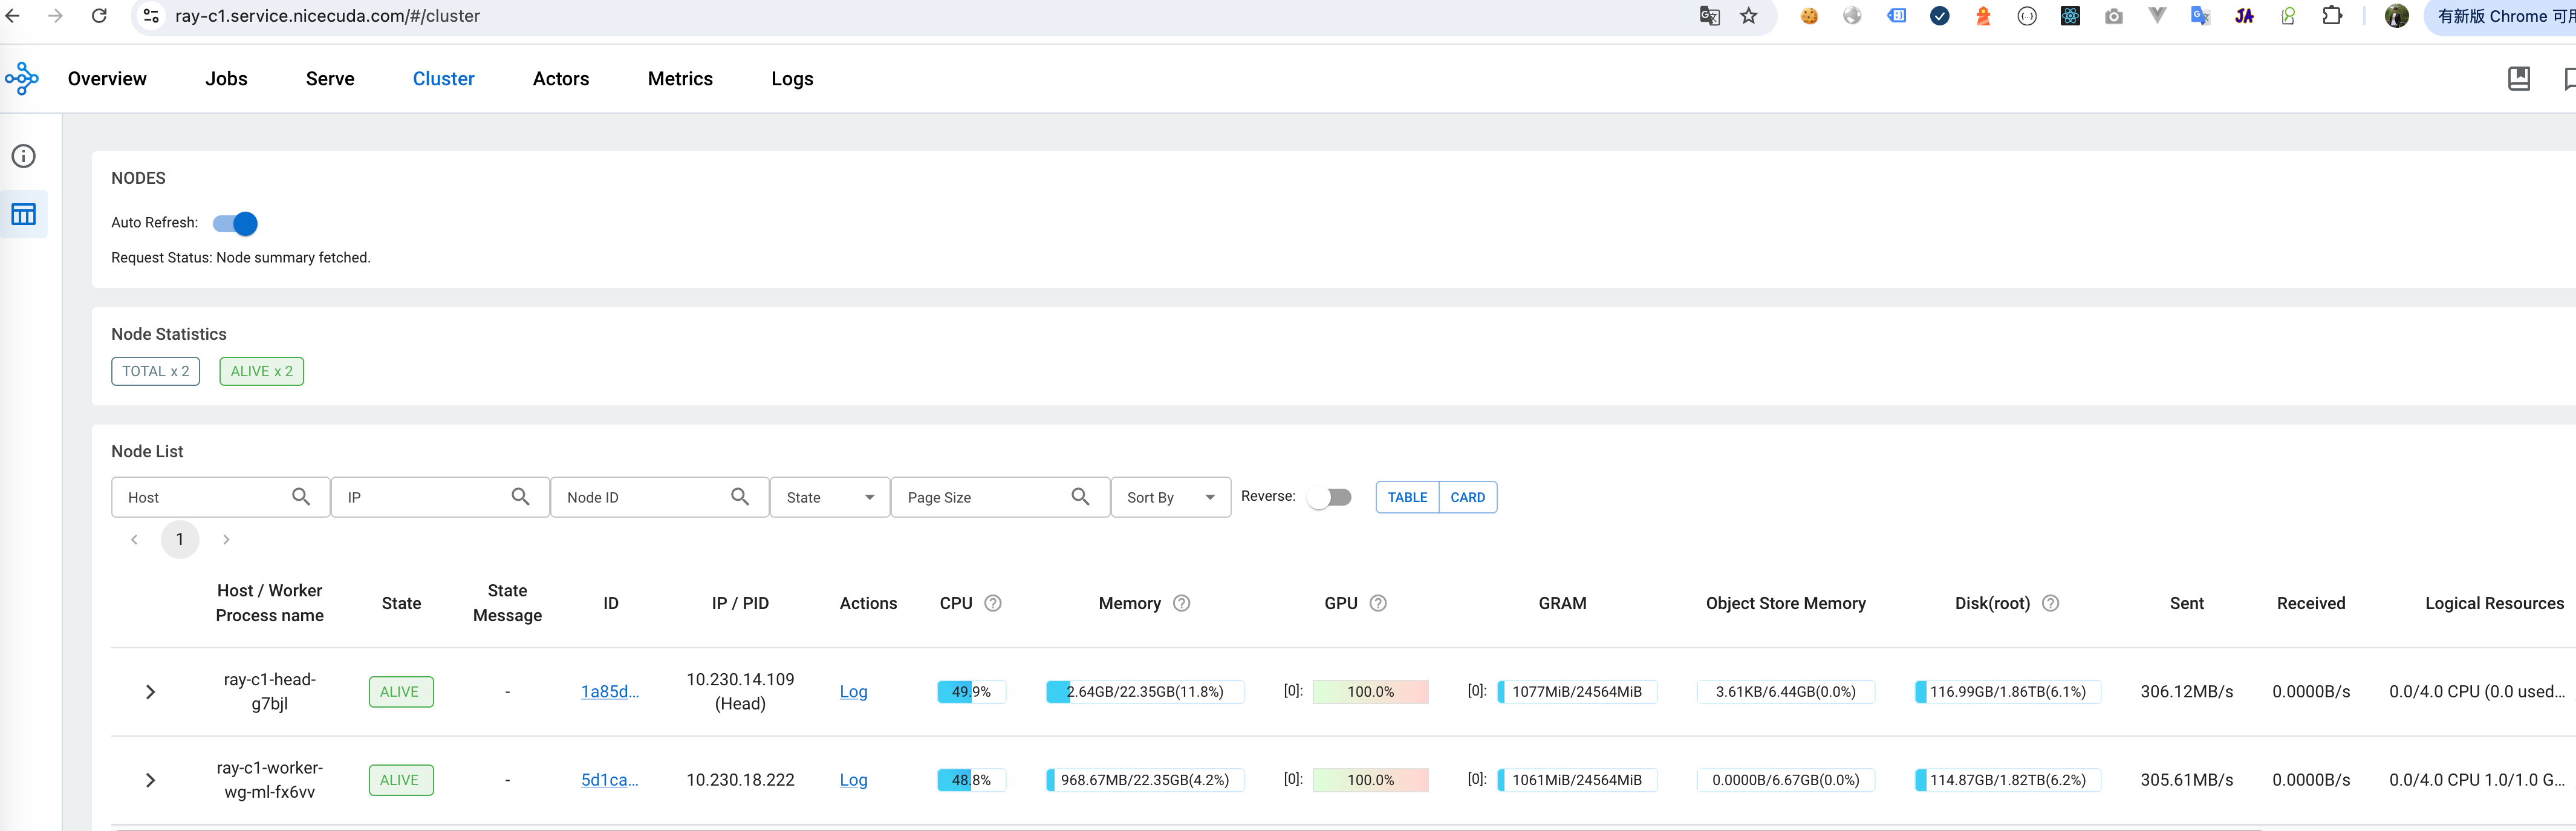 Dashboard -> Cluster You can view the resource usage of GPU, CPU and other resources, and the health of RayCluster cluster nodes.
 -
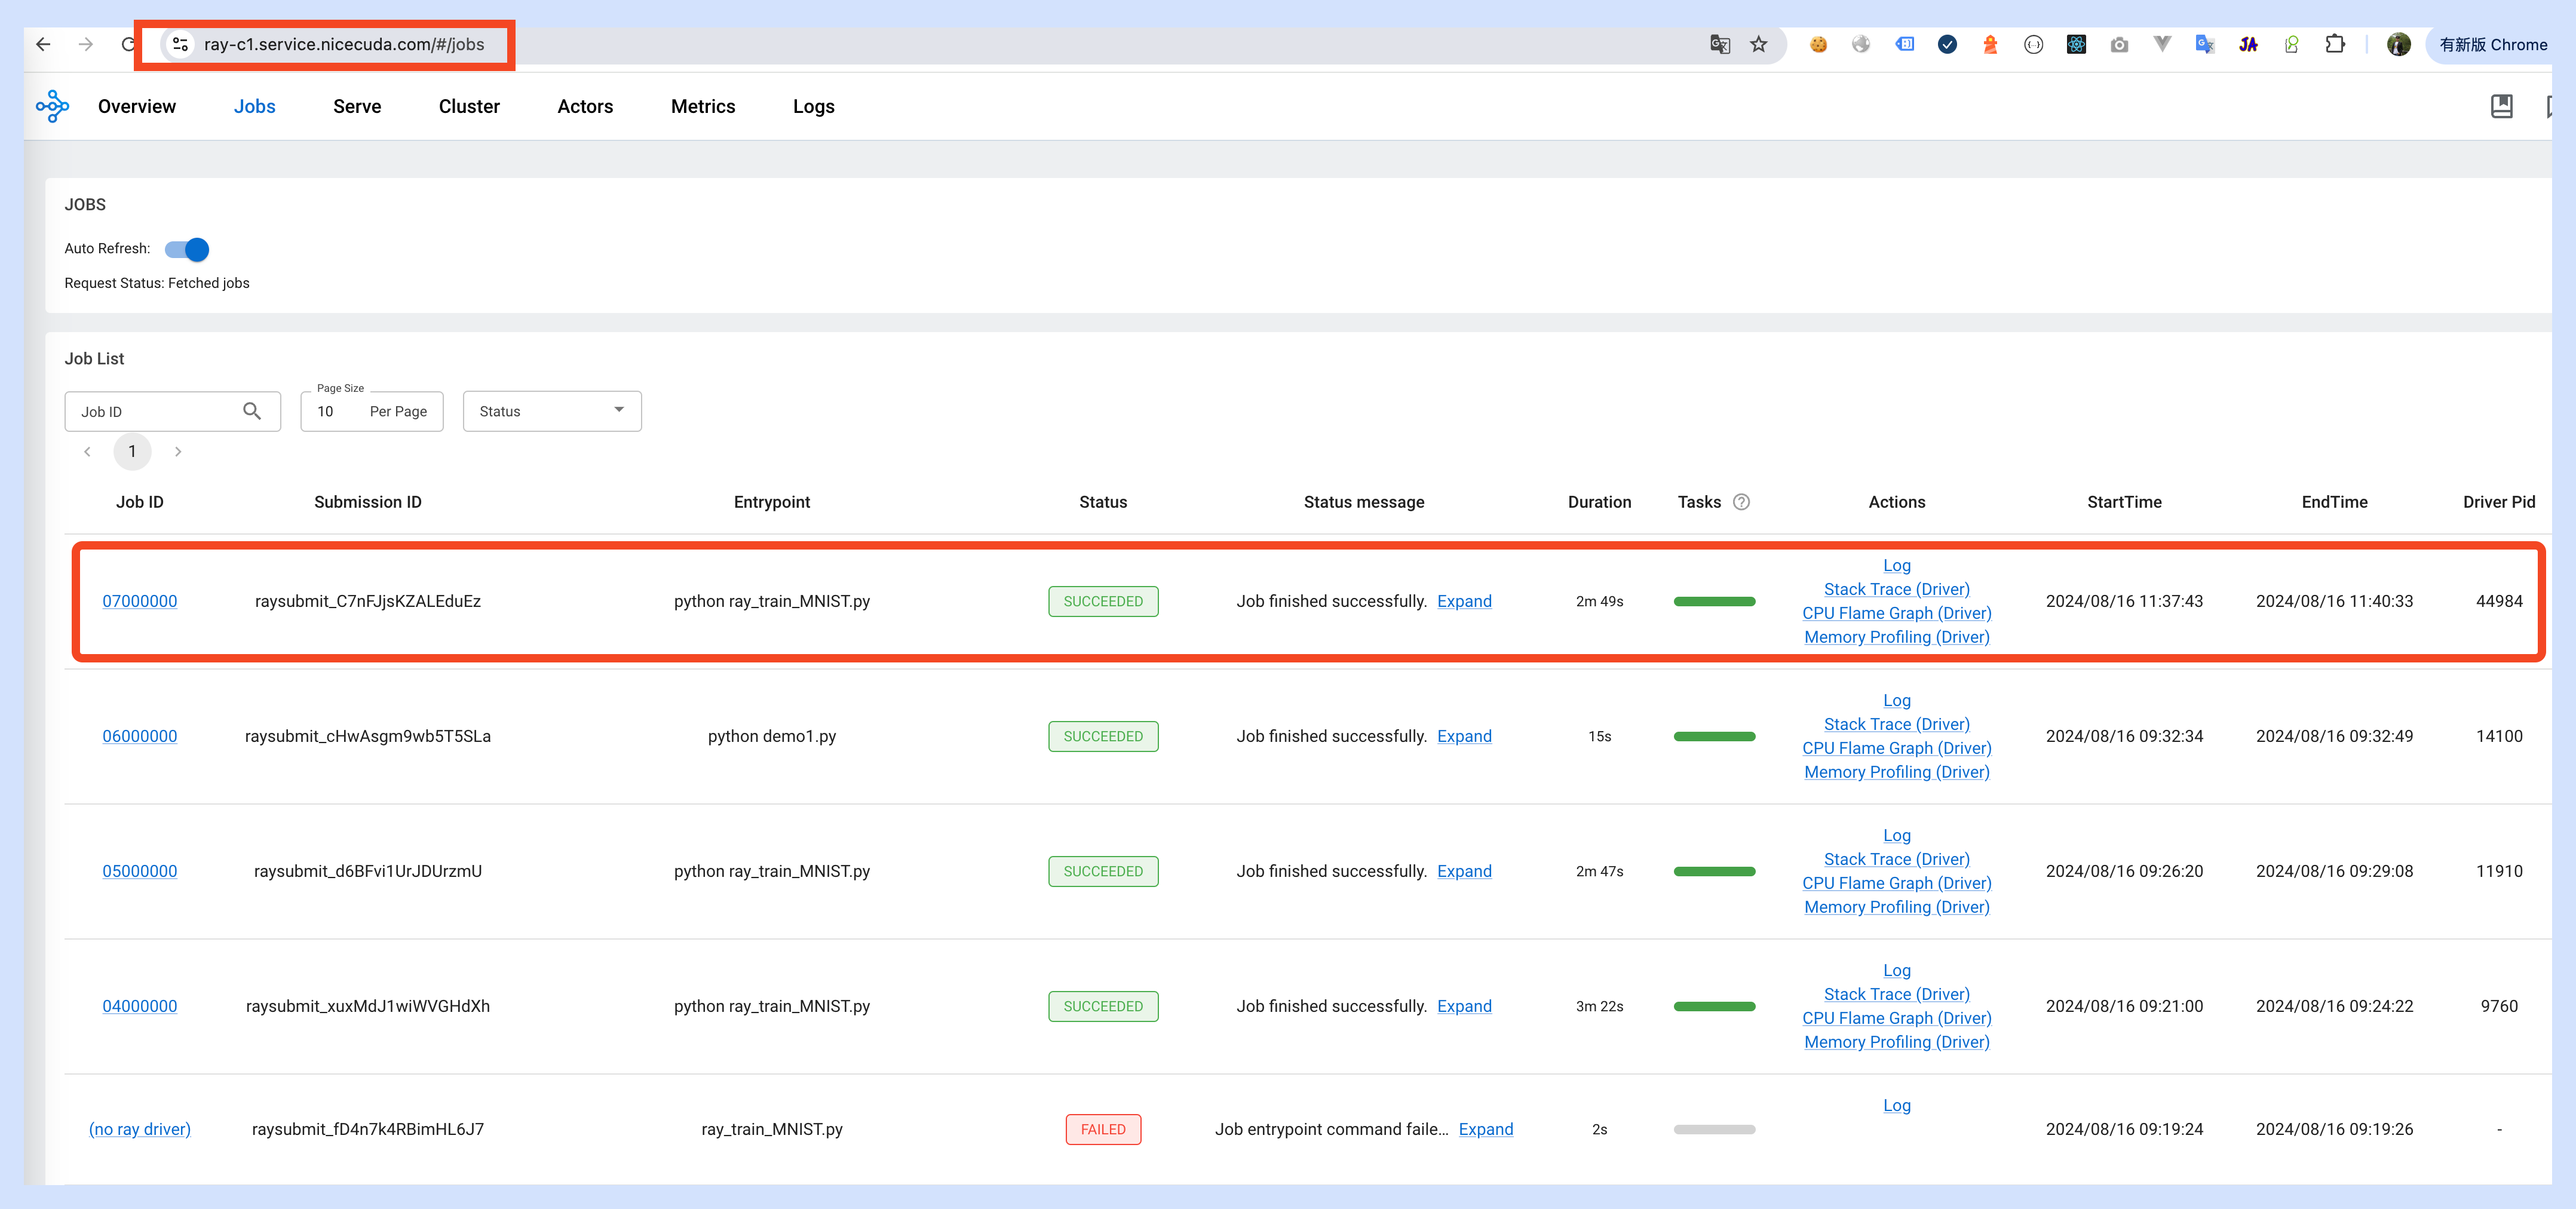
View the Log of the currently executing Job:https://ray-c1.service.nicegpu.com/#/jobs
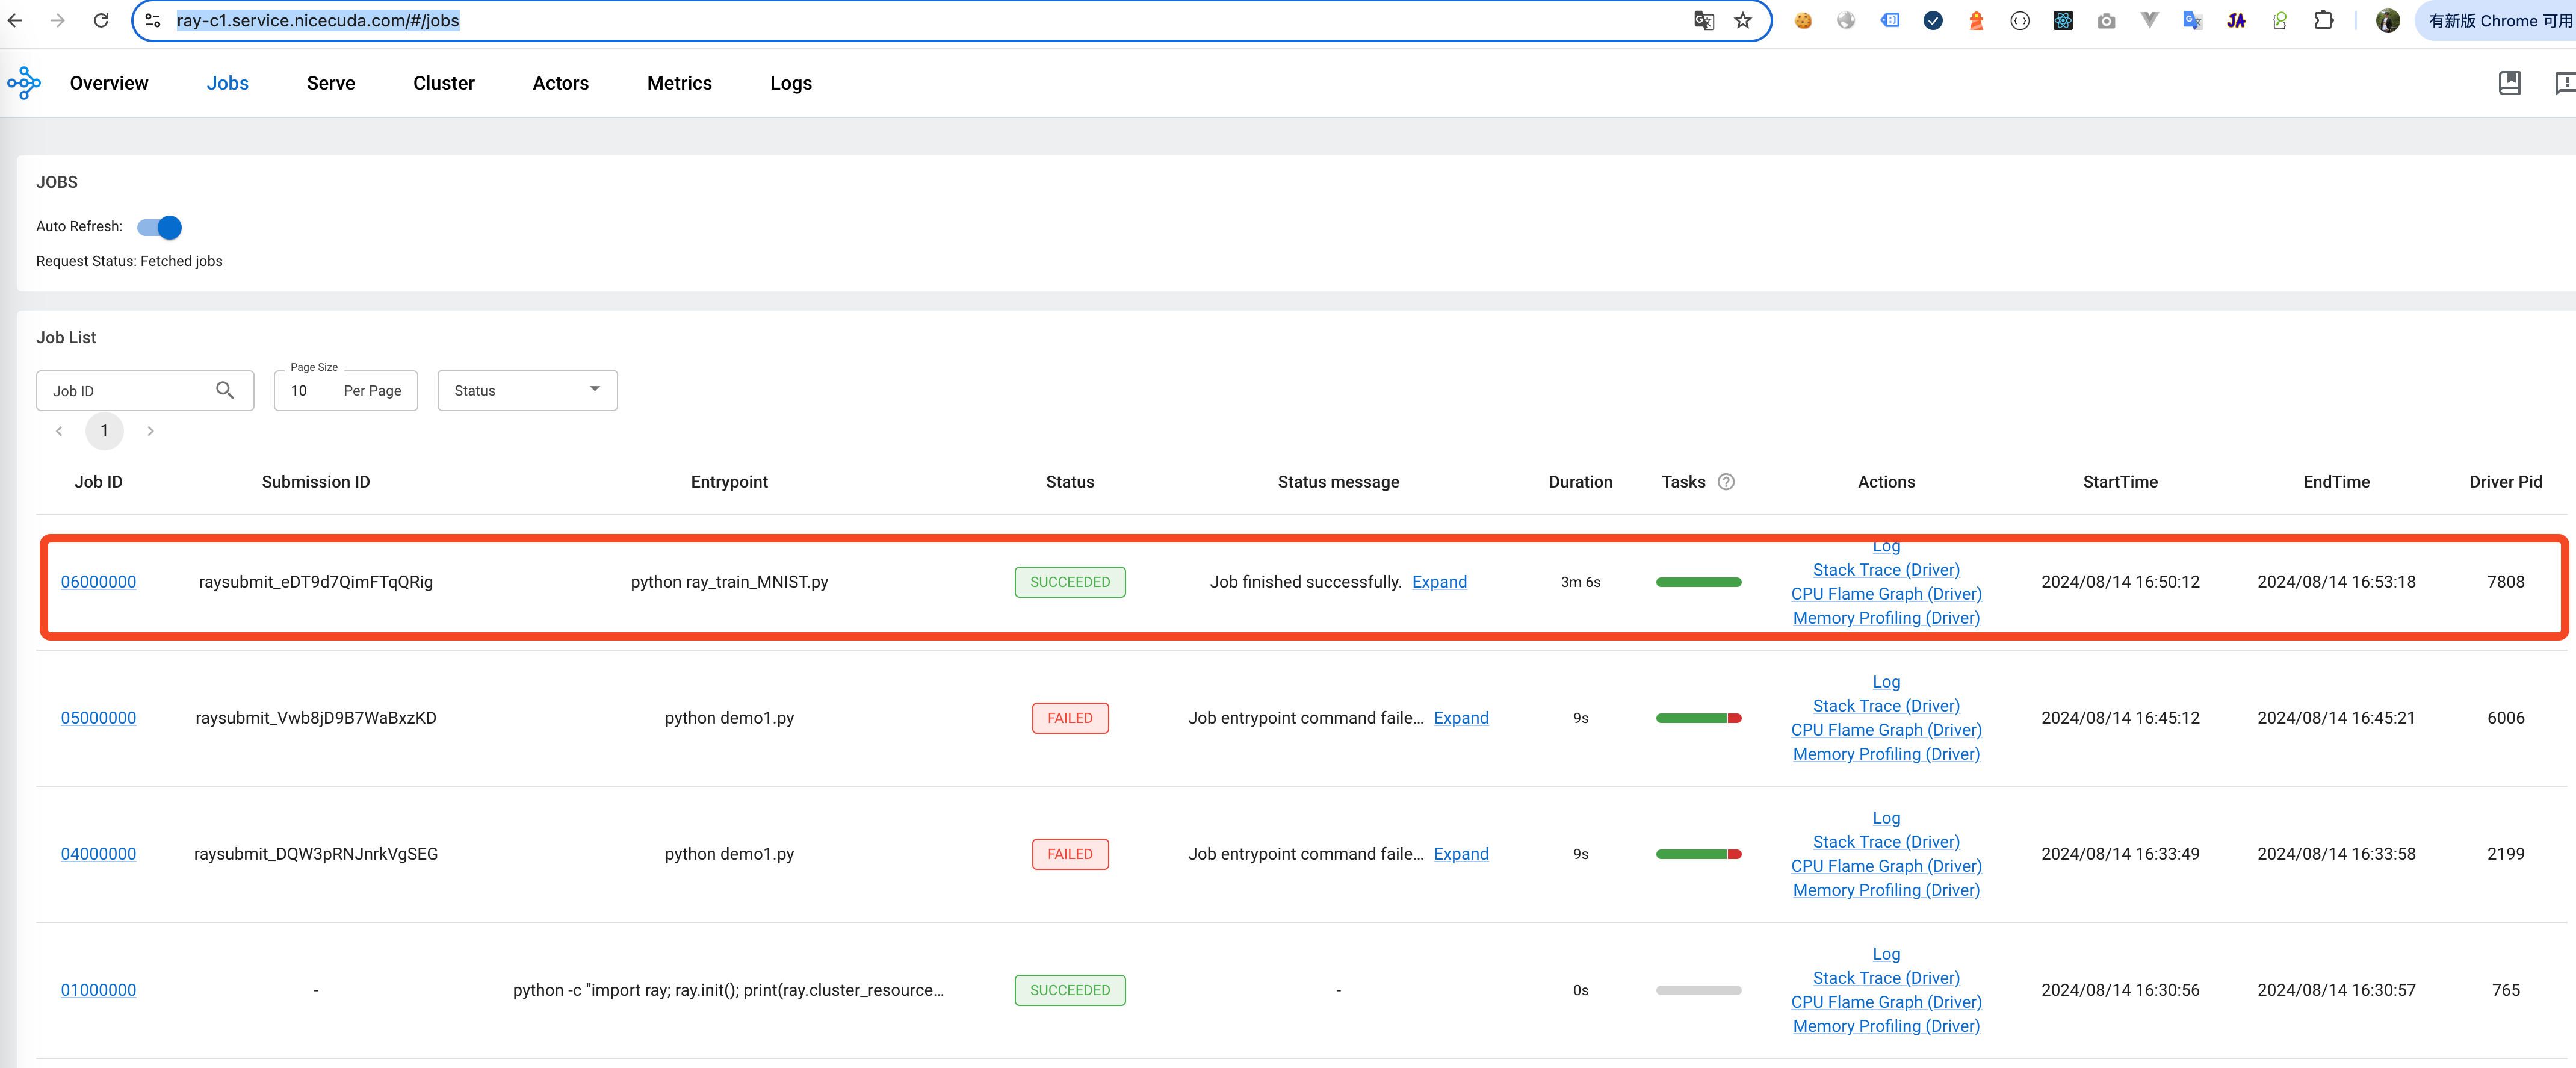 Dashboard -> Jobs You can view the status, logs and other information of the currently executing Job.
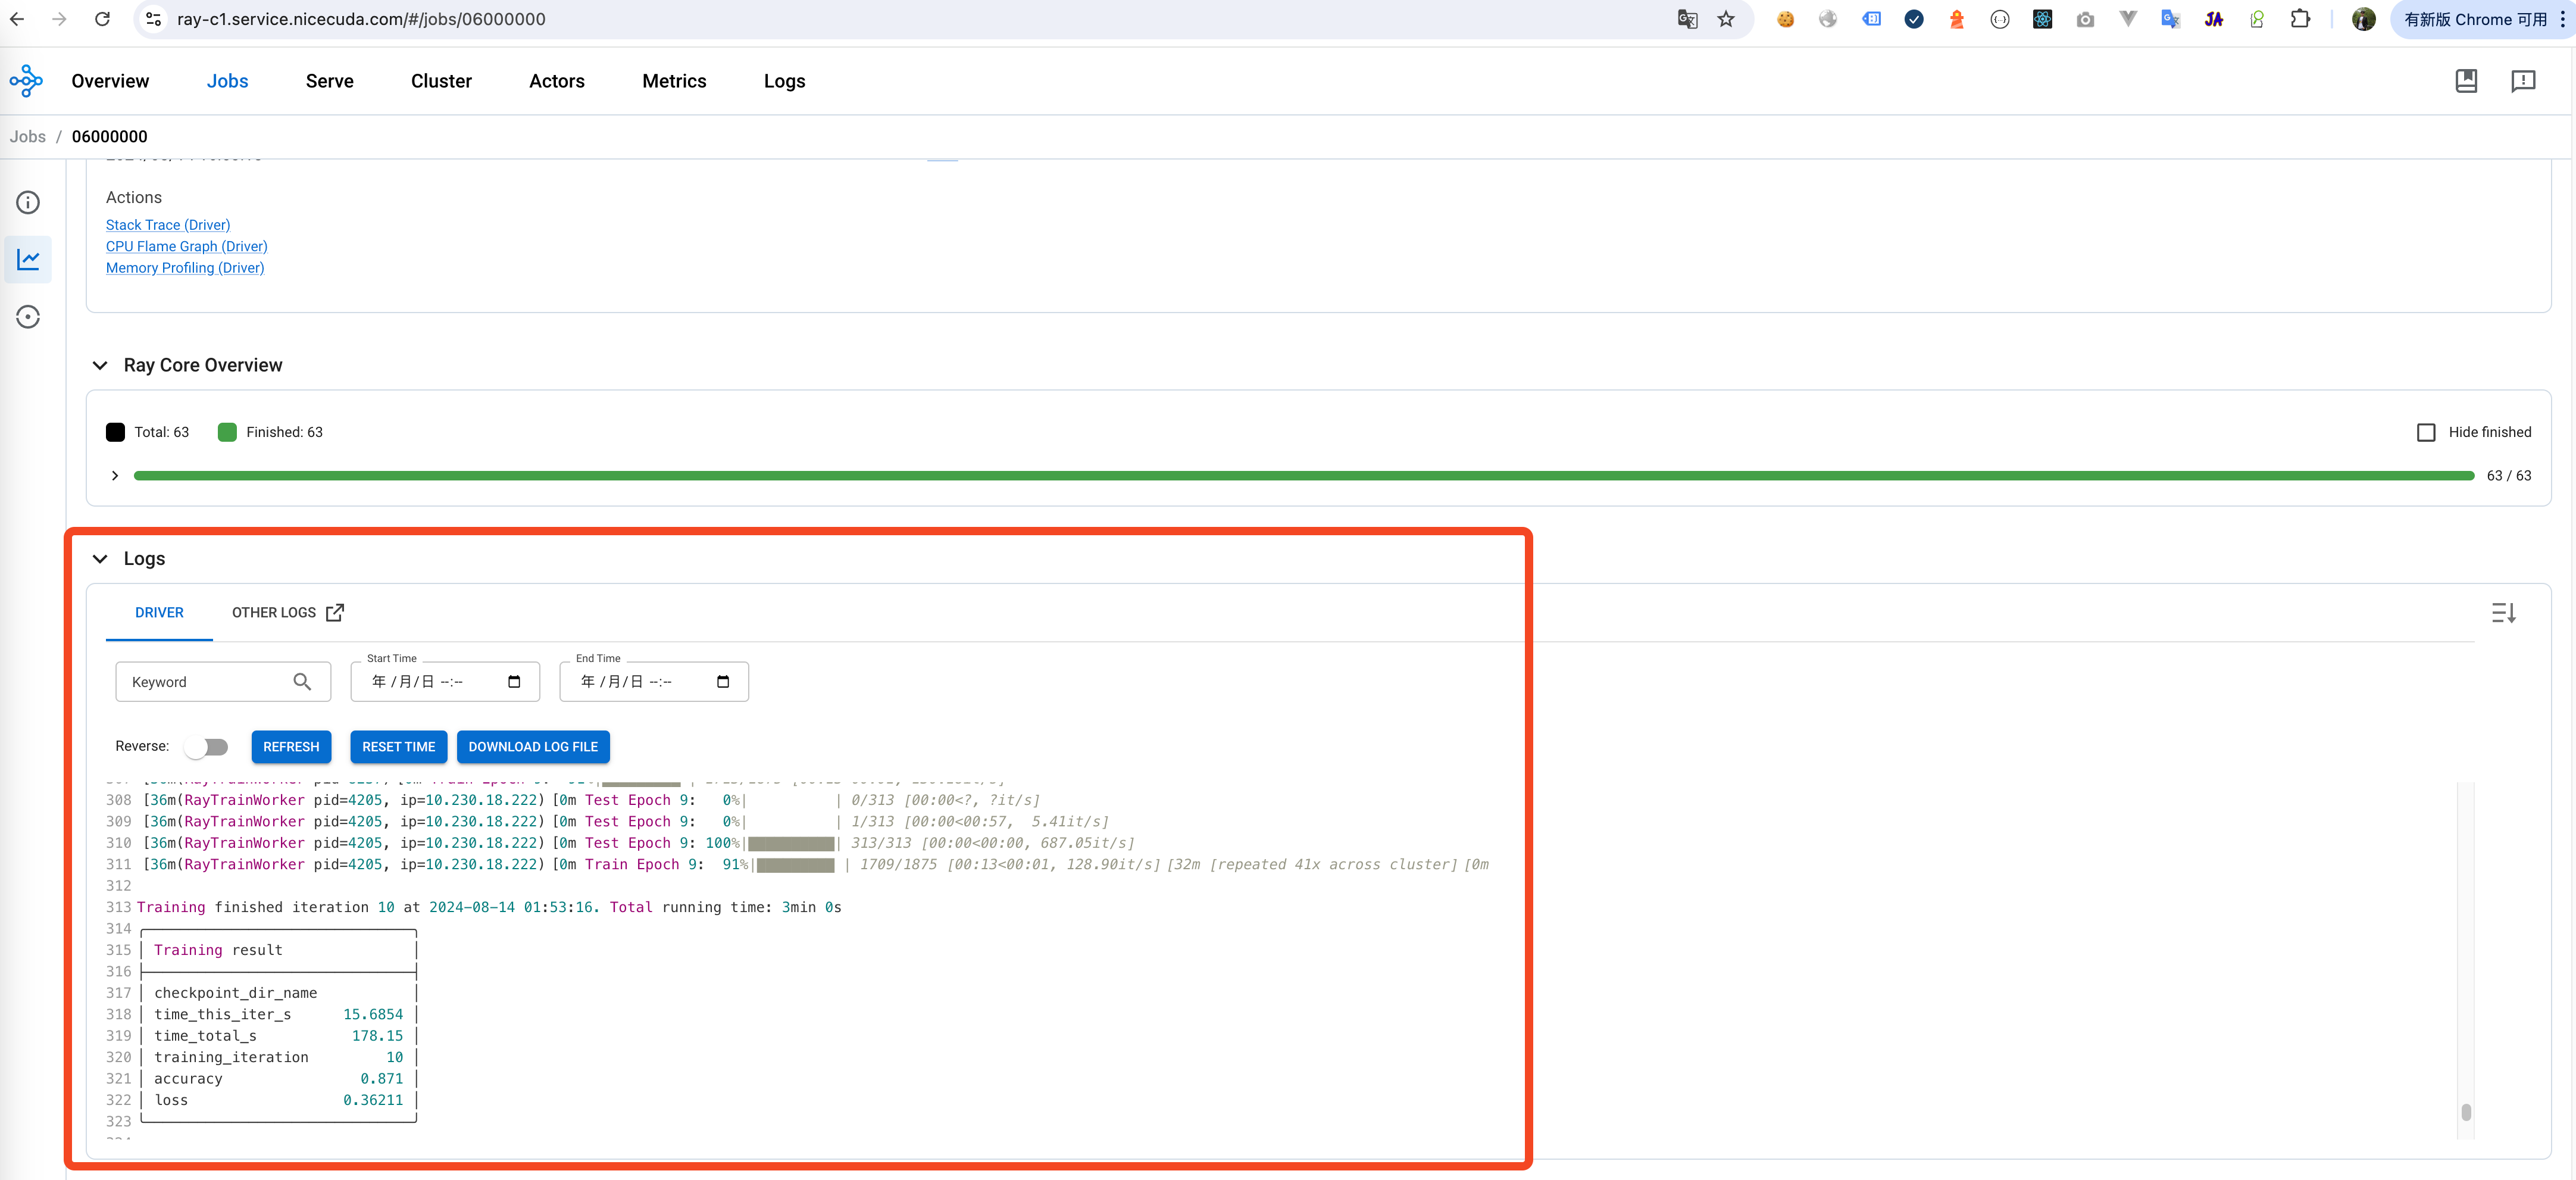
output log of job:
Dashboard -> Jobs You can view the status, logs and other information of the currently executing Job.
output log of job:
-
If the job is submitted through PyCharm, you can view the results of the job through the terminal