Frequently Asked Questions (FAQ)
This document answers common questions about using the NiceGPU platform, covering basic information, instance management, AI model usage, and development environment configuration.
Table of Contents
- Basic Information
- Platform Usage Policies
- Instance Management
- AI Model Usage
- Development Environment Configuration
Basic Information
1. Can't find the template image you need?
NiceGPU provides various pre-configured template images. If the current templates don't meet your requirements, you can:
- Use a base image: Select the
Minimal Notebookbase image and install the required environment and dependencies yourself - Contact support: Reach out to us through the following channels, and we'll evaluate and add the template you need as soon as possible
- Email: support@nicegpu.com
- Reddit: https://www.reddit.com/r/nicegpu/
2. What does "Online Count" in the GPU list mean?
Online Count represents the total number of online GPUs of that type, including:
- GPUs currently in use by users
- GPUs currently available
This number is not the count of available GPUs. The actual available count depends on current usage.
3. What's the difference between different Jupyter Notebook images?
The Jupyter Notebook images provided by NiceGPU are all based on official Jupyter Docker Stacks images. Different images come with different pre-installed software packages and development environments:
- Base images: Include only core Jupyter Notebook functionality
- Data science images: Pre-installed with data science libraries like NumPy, Pandas, Matplotlib
- Machine learning images: Pre-installed with deep learning frameworks like TensorFlow, PyTorch
- Other specialized images: Pre-configured environments for specific domains (e.g., R, Spark)
Please choose the appropriate image based on your actual needs. For detailed differences and selection guidelines, refer to the Jupyter Docker Stacks official documentation.
Platform Usage Policies
Prohibited Activities
To ensure platform security and fairness, NiceGPU strictly prohibits the following activities:
- Cryptocurrency mining: Prohibited from using platform resources for cryptocurrency mining
- Password cracking: Prohibited from performing brute force or dictionary attacks
- Denial of Service (DDoS) attacks: Prohibited from initiating or participating in any form of network attacks
- P2P file sharing and torrent downloads: Prohibited from using BitTorrent and other P2P protocols
- Remote proxy connections: Prohibited from using instances as proxy servers or VPN nodes
- Multi-account restriction circumvention: Prohibited from using multiple accounts to circumvent platform usage limits
- Deepfakes: Prohibited from using platform resources to generate deepfake content
- Technical circumvention of anti-abuse policies: Prohibited from using technical means to circumvent platform security and anti-abuse mechanisms
Accounts violating these policies will be suspended or permanently banned. Please use platform resources responsibly.
Instance Management
1. Can I use Docker or run custom images?
Not supported. For security and stability reasons, the NiceGPU platform:
- Does not support running Docker: Instances run in containerized environments and cannot nest Docker containers
- Does not support custom images: Only pre-configured template images provided by the platform can be used
If you need specific software environments, please use the Minimal Notebook base image and install configurations yourself.
2. Can't start an instance after it expires?
Yes. Instances cannot be started after expiration and require renewal first.
After renewal, the instance will return to normal status and you can continue using it.
3. Can I modify instance configuration after creation?
Not supported. After an instance is created, the following configurations cannot be modified:
- GPU model and quantity
- Memory size
- Storage space
- Other hardware configurations
If you need different configurations, please:
- Delete the current instance (back up important data first if needed)
- Create a new instance with the new configuration
4. Error when creating an instance: "Container not found"
Cause: The host machine encountered an issue and cannot create a container instance.
Solution:
- Delete the failed instance
- Recreate the instance
- If the problem persists, contact technical support: support@nicegpu.com
5. Error when creating an instance: "Out of memory"
Cause: The template image you selected has high GPU memory (VRAM) requirements, and the current host machine has insufficient GPU memory.
Solution:
- Delete the failed instance
- Select a GPU model with larger memory
- Recreate the instance
Recommendation: Before creating an instance, confirm the memory requirements of your selected template and choose an appropriately sized GPU.
6. How to use an instance after it's created?
After an instance is successfully created, it will automatically start. Follow these steps:
- Confirm instance status: In the instance list, the Status column should display
Running - Access services: In the Compute Connection column, click the corresponding service link address
- Start using: Depending on the template type, you'll see:
- Jupyter Notebook: Web IDE interface
- AI model services: API endpoints or Web UI
- Other services: Corresponding access interfaces
AI Model Usage
1. How to use DeepSeek models?
NiceGPU supports the following DeepSeek models:
- DeepSeek R1: 1.5B, 7B, 8B, 14B
- DeepSeek Code V2: 16B
Usage methods:
- Web interface: Refer to Chat with DeepSeek
- API calls: Refer to How to use DeepSeek-R1, Llama
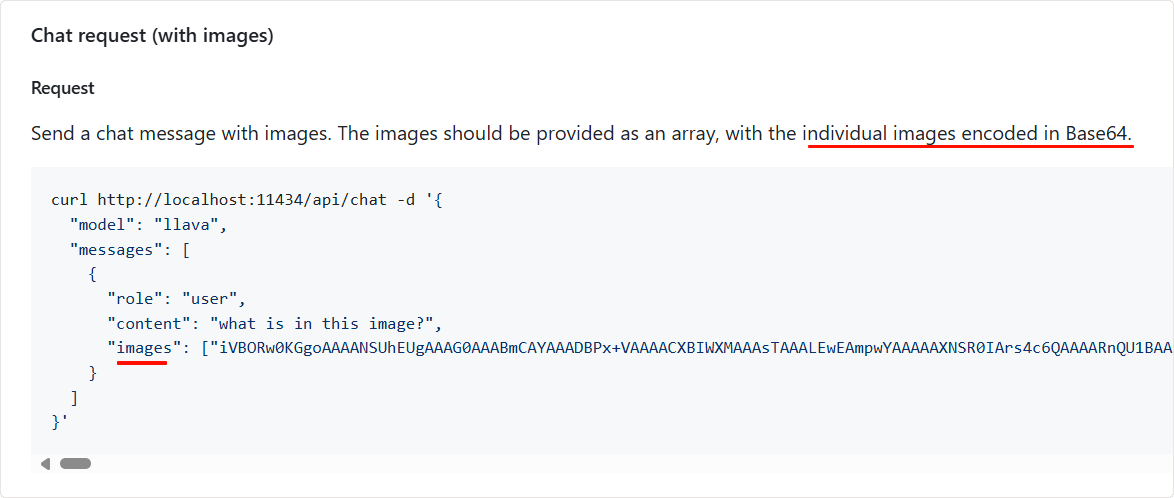
2. Do AI models support image uploads?
Partially supported. Some models in the Ollama framework support multimodal (Vision) capabilities and can process image inputs.
Supported models:
Llama 11B(Vision version)Gemma3 12B(Vision version)
Usage methods:
Method 1: API calls
Add Base64-encoded image data to your API requests. For detailed instructions, refer to the Ollama official API documentation.
Method 2: Use UI tools that support Vision
You can use third-party UI tools that support Ollama API image uploads, such as:
- Cherry AI: Supports Vision feature (recommended)
- Tools that do NOT support:
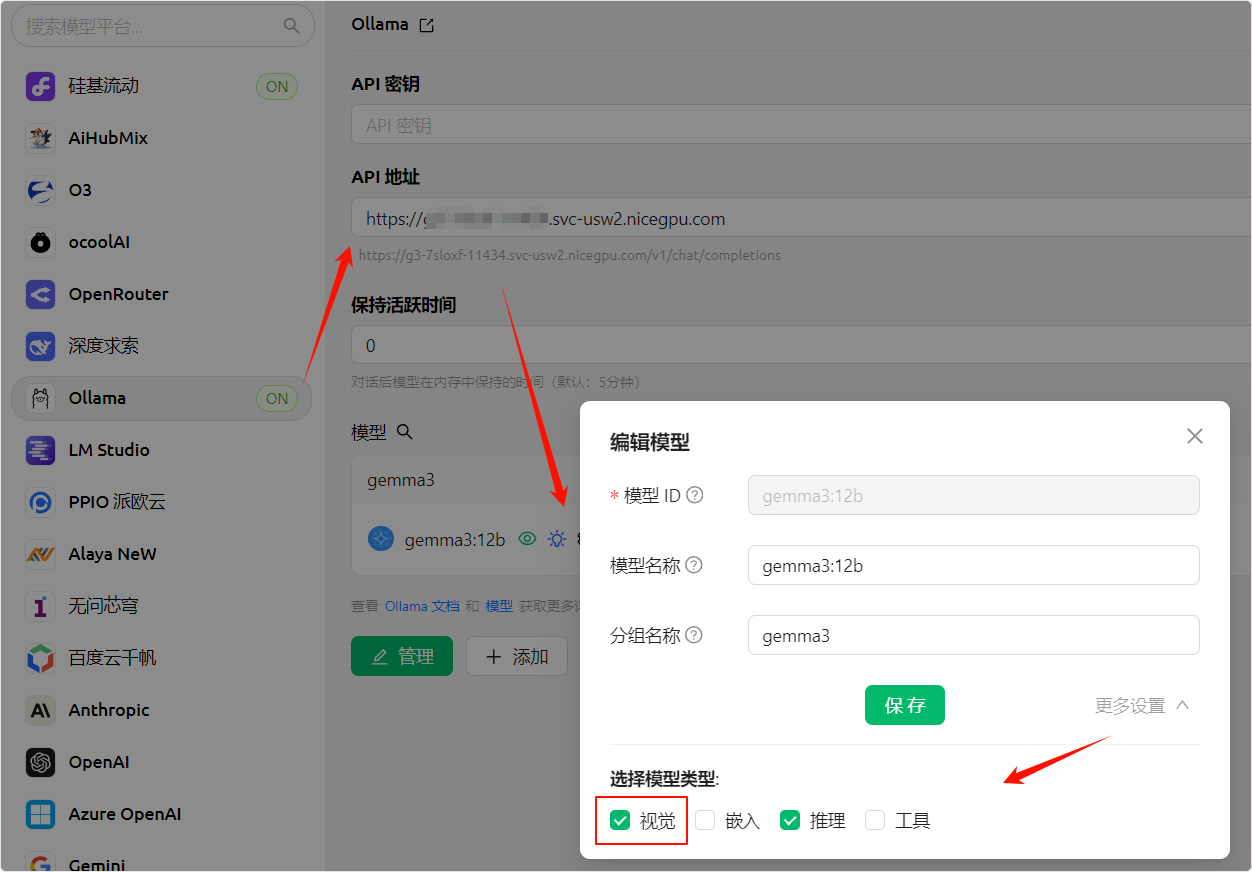
In UI tools that support Vision, you can directly upload images in the chat input box.

3. When opening DeepSeek API service, it shows "Ollama is running"?
This is normal. NiceGPU loads and runs DeepSeek models through the Ollama framework, therefore:
- Status display: The service status will show "Ollama is running"
- API calling method: You need to follow the Ollama API specifications for API calls
DeepSeek models are integrated into the Ollama framework, and you can interact with DeepSeek models using the standard Ollama API.
Development Environment Configuration
1. Getting an error when uploading files larger than 100MB in Jupyter Notebook?
Cause: Jupyter Notebook's default configuration limits file upload size to 100MB.
Solution:
Not recommended to modify the limit
For security and performance reasons, we do NOT recommend modifying this limit.
Recommended approach:
- Use cloud storage: Upload large files to third-party cloud storage services (e.g., Google Drive, Dropbox, OneDrive)
- Download for use: Use
wgetorcurlcommands in Jupyter Notebook to download files - Use Git LFS: For large files in code repositories, use Git LFS for management
Example:
# Download file using wget
!wget https://example.com/large-file.zip

# Or use Python requests
import requests
url = "https://example.com/large-file.zip"
response = requests.get(url, stream=True)
with open("large-file.zip", "wb") as f:
    for chunk in response.iter_content(chunk_size=8192):
        f.write(chunk)
2. Why is there no systemctl command?
Cause: NiceGPU instances run in containerized environments, not traditional cloud virtual hosts.
Explanation:
- Container environments do not support system service management commands like
systemctlandservice - Processes within containers are managed directly by the container runtime
- If you need to manage background services, use alternative methods (e.g.,
nohup,screen,tmux)
Alternatives:
# Use nohup to run services in the background
nohup python app.py &

# Use screen to manage sessions
screen -S mysession
python app.py
# Press Ctrl+A then D to detach, use screen -r mysession to resume

# Use tmux to manage sessions
tmux new -s mysession
python app.py
# Press Ctrl+B then D to detach, use tmux attach -t mysession to resume
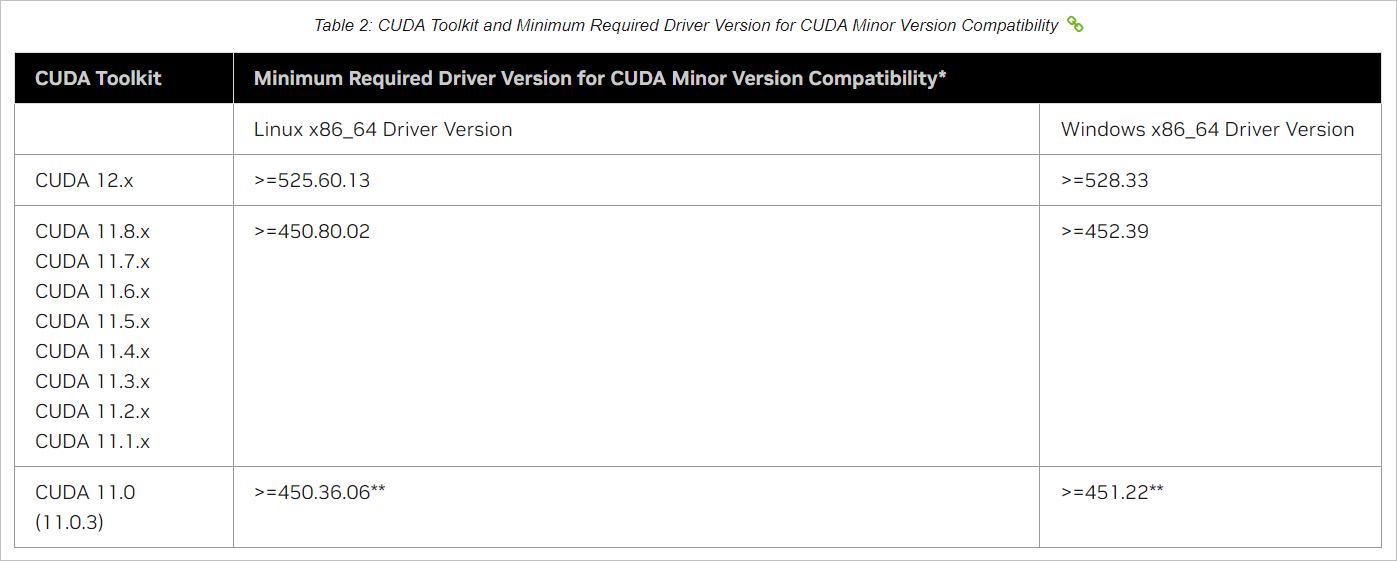
3. How to install CUDA Toolkit?
CUDA Toolkit is essential for NVIDIA GPU development. Before installation, confirm driver version compatibility.
Installation steps:
- Check driver version: Use the
nvidia-smicommand to view the current NVIDIA driver version
nvidia-smi
- Check compatibility: Refer to the NVIDIA CUDA Toolkit version compatibility documentation to confirm which CUDA Toolkit versions are supported by your driver version
- Download and install: Based on your operating system version, download the corresponding CUDA Toolkit from the NVIDIA official download page
Take Ubuntu as an example
For other operating systems, please refer to https://developer.nvidia.com/cuda-downloads for installation.
Important: If you install CUDA Toolkit in Jupyter Notebook, you need to restart the Kernel (Kernel → Restart Kernel) after installation to ensure the new environment variables take effect.
# Add NVIDIA CUDA repository key
wget https://developer.download.nvidia.com/compute/cuda/repos/ubuntu2204/x86_64/cuda-keyring_1.1-1_all.deb
sudo dpkg -i cuda-keyring_1.1-1_all.deb

# Update package list
sudo apt-get update

# Install CUDA Toolkit 12.6
sudo apt-get -y install cuda-toolkit-12-6

# Verify installation
/usr/local/cuda-12/bin/nvcc --version
# Add NVIDIA CUDA repository key
wget https://developer.download.nvidia.com/compute/cuda/repos/ubuntu2404/x86_64/cuda-keyring_1.1-1_all.deb
sudo dpkg -i cuda-keyring_1.1-1_all.deb

# Update package list
sudo apt-get update

# Install CUDA Toolkit 12.8
sudo apt-get -y install cuda-toolkit-12-8

# Verify installation
/usr/local/cuda-12/bin/nvcc --version
Verify installation:
After installation, use the following commands to verify that CUDA Toolkit is correctly installed:
# Check CUDA compiler version
/usr/local/cuda-12/bin/nvcc --version

# Check CUDA runtime version
python -c "import torch; print(torch.version.cuda)"
Get Help
If your question is not answered in this document, please contact us through:
- Email support: support@nicegpu.com
- Reddit community: https://www.reddit.com/r/nicegpu/
We will respond to your questions as soon as possible.