How to Run DeepSeek-OCR Model
This document describes how to run the DeepSeek-OCR model on the NiceGPU platform.
Method 1: One-Click Deployment with Pre-built DeepSeek OCR App
Select the pre-built DeepSeek OCR App from the AI model templates for one-click deployment that's ready to use out of the box.

The application includes the DeepSeek OCR model with a modern web interface (optimized for security and user experience based on open-source projects).
The application supports real-time preview, progress display, and automatic reconnection on timeout to ensure a smooth user experience.
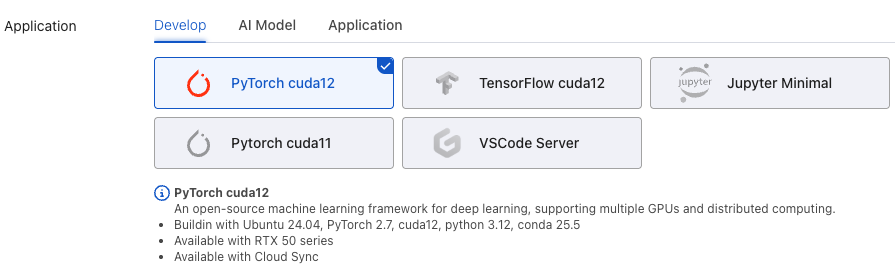
Method 2: Build Environment from Scratch Using Development Template
For custom configurations or secondary development, you can use the development template to build the environment from scratch. You can download the sample Notebook file: deepseek-ocr.ipynb
1. Create an Instance
Create an instance on the NiceGPU platform with the following configuration:
- Template:
PyTorch CUDA 12 - GPU: RTX 5090 or RTX 4090 (recommended)
2. Install Base Dependencies
# Note: PyTorch version must be compatible with the flash-attn pre-built version
# It is recommended to use pre-built versions to avoid long compilation times
pip install torch==2.8.0 transformers==4.46.3 tokenizers==0.20.3 einops addict easydict
3. Install CUDA Toolkit (nvcc)
# Download and install CUDA keyring
wget https://developer.download.nvidia.com/compute/cuda/repos/ubuntu2404/x86_64/cuda-keyring_1.1-1_all.deb
sudo dpkg -i cuda-keyring_1.1-1_all.deb
sudo apt-get update

# Install CUDA Toolkit 12.8
sudo apt-get -y install cuda-toolkit-12-8

# Verify installation
/usr/local/cuda-12/bin/nvcc --version
4. Install Flash Attention
# Important: Use pre-built versions to avoid long compilation times (reference: https://github.com/Dao-AILab/flash-attention/releases)
# If compiling from source, the installation may hang at the "Building wheel for flash-attn" step, taking approximately 5-15 minutes
export PATH=/usr/local/cuda-12/bin:$PATH && pip install flash-attn==2.8.3 --no-build-isolation
5. Install Additional Dependencies and Run Sample Code
First, install the required Python packages:
pip install tqdm ipywidgets pillow matplotlib torchvision
Then run the following sample code:
from transformers import AutoModel, AutoTokenizer
import torch
import os

# Set the GPU device to use
os.environ["CUDA_VISIBLE_DEVICES"] = '0'
model_name = 'deepseek-ai/DeepSeek-OCR'

# Load tokenizer and model
tokenizer = AutoTokenizer.from_pretrained(model_name, trust_remote_code=True)
model = AutoModel.from_pretrained(
    model_name,
    _attn_implementation='flash_attention_2',
    trust_remote_code=True,
    use_safetensors=True
)
model = model.eval().cuda().to(torch.bfloat16)

# Configure inference parameters
# Prompt options:
# - "<image>\nFree OCR. "  # Basic OCR
# - "<image>\n<|grounding|>Convert the document to markdown. "  # Convert to Markdown
prompt = "<image>\n<|grounding|>Convert the document to markdown. "
image_file = 'fig1.png'  # Please modify to your image path
output_path = 'out-dir'  # Please modify to your output directory path

# Model configuration parameters:
# - Tiny: base_size=512, image_size=512, crop_mode=False
# - Small: base_size=640, image_size=640, crop_mode=False
# - Base: base_size=1024, image_size=1024, crop_mode=False
# - Large: base_size=1280, image_size=1280, crop_mode=False
# - Gundam: base_size=1024, image_size=640, crop_mode=True

# Execute inference
res = model.infer(
    tokenizer,
    prompt=prompt,
    image_file=image_file,
    output_path=output_path,
    base_size=1024,
    image_size=640,
    crop_mode=True,
    save_results=True,
    test_compress=True
)
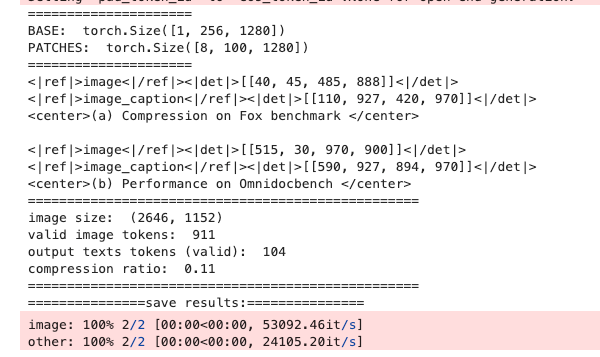
After successful execution, the results will be saved to the specified output directory. Example output: